Hello Subscribers!
Hello again, subscribers! The subject line is lying to you. This isn’t a real new post, I just wanted to invite you all again to resubscribe. Thank you to those of you who already have, I really appreciate it.
As you may know, I am officially on the new site (hollyshelpings.com) and many of you have not resubscribed. If you’d like to continue to receive emails when I post a new recipe you can simply go to this website: http://feedburner.google.com/fb/a/mailverify?uri=HollysHelpings&loc=en_US. This will take you to a page where you can enter your email address and subscribe. You will then receive an email asking you to confirm your subscription. If you do not resubscribe, then you will not get updates when I post. If you are tired of the email subscription, you can also find me on Facebook, Twitter, or Pinterest and receive updates that way. All these links are on the new website on the top of the sidebar.
I hope you all join me on my new site and I’m really sorry for this inconvenience of resubscribing.
-Holly
Moving to Self-Hosted Site!
Hello subscribers! I am moving this blog to a self-hosted site at hollyshelpings.com. Unfortunately, this means that you’ll need to subscribe again at the new site (lame, I know, but there’s no way to forward my subscriptions to my new site). Please check out the new site and let me know your thoughts. The transfer will begin a few moments after I post this.
This new site allows for more customization than wordpress.com. If there is anything you don’t like or think could be better, please let me know since I can probably change it.
Apple Onion Puff
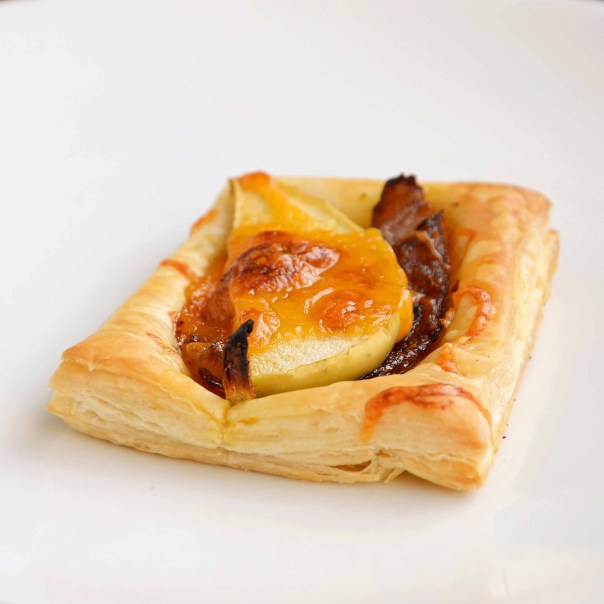
Whenever I see a picture of food and it has puff pastry in it, I always want to eat it immediately. Unfortunately, I had a bad experience with puff pastry when I accidentally set fire to my boyfriend’s oven. It was a minor fire, but his housemates were not too pleased about the failed experiment and I haven’t used puff pastry since. I decided to try to start forgiving puff pastry by using prepared sheets of it instead of making it myself. I wanted to make little appetizer bite for New Year’s Eve and puff pastry seemed like the simplest way to do that. I just put a few things on top that I thought sounded good and baked them according to the directions. It was very simple and, I’m proud to say, there were no fires.
I wanted these to be a more savory than sweet so they would be a nice little appetizer instead of dessert. I used onion, cheddar cheese, and apple on top of a square of puff pastry. These little bites would be great for a party as an appetizer. They are flavorful and can be eaten easily as finger food.
Recipe:
Ingredients:
2 sheets of puff pastry (I got mine from Trader Joe’s)
1/2 red onion
1 tbsp olive oil
1 medium apple
1 cup shredded cheddar cheese
1/4 tsp garlic powder
1/4 tsp chili powder
Prep time: 20 minutes
Bake time: 15-20 minutes
Servings: 18 3″x3″ squares
Cooking Instructions:
If using frozen puff pastry, remove from the freezer to begin defrosting. Cut the onion into thin slices. Heat the olive oil in a skillet over medium heat. Add the onion, garlic powder, and chili powder. Saute the onions until they are soft and browning. Remove from heat. Slice the apple into thin slices. Cut the puff pastry into 3″x3″ squares. If using Trader Joe’s puff pastry sheets, this would be 9 squares per sheet. Gently press the tines of a fork around the inside of the squares leaving about a half inch margin. Preheat the oven to whatever temperature specified by the puff pastry instructions (I baked mine at 400°F). Place a small portion of the onion in the middle of each square topped with a slice of apple and followed by about a tablespoon of cheddar cheese. Place the squares onto a lightly buttered cooking sheet using two if necessary. Bake for the time specified (mine said 15 minutes, but I baked them for about 20 minutes total). Allow to cool and then enjoy!
Mike’s Sunrise (Holly’s NYE Drink)
I made a delicious drink today. I was going to post about it tomorrow, but I think everyone will be hung over and not want to hear about an alcoholic drink. I think that’s how I’m going to feel at least. Right now though, I feel good and I’m looking for a delicious New Year’s Eve Drink.
This drink is probably one of the prettiest drinks I’ve ever made. Not just because it’s in a martini glass (which automatically makes everything prettier), but it’s also pink, layered, has a sugar rim, and has a cherry in it. That’s just the perfect recipe for a pretty drink. It’s also really simple to make.
When I was trying to think of a drink, I was trying to use up some Mike’s Hard that we had bought. I had the idea to come up with a drink to make each flavor of Mike’s Hard more tolerable, but by the time I got around to actually doing that there were only 2 flavors out of the 4 left. So I was left with just revamping the original flavor. This is what I came up with. I think that it’s very delicious and not too sweet at all. My boyfriend liked it even and he’s a strong drink and dark beer kind of guy.
Happy New Year’s everyone! Stay safe and have fun!
Recipe:
Ingredients/Equipment:
1 cherry
1 martini glass
sugar
1 skewer or bar straw
1/2 Mike’s Hard Lemonade
1 shot tequila
splash of grenadine
Prep Time: 5 minutes
Instructions
Wet the rim of a martini glass with water using your finger. Place the rim in a bowl of sugar to fully coat it. Skewer the cherry with the skewer or bar straw and place across the top of the martini glass. Pour in the tequila. Add the Mike’s Hard and fill until the liquid is about a 1/2″ or 1 cm away from the sugar on the rim. Add the splash of grenadine. Enjoy and don’t forget to for second helpings (unless it’s time to take a break and drink some water)!
Review of Trader Joe’s Pumpkin Muffin/Bread Mix
I love Trader Joe’s. If you’ve read many of my posts, you probably know that I always say that you can find the weird ingredient at Trader Joe’s. One of my first times there, I bought a mix for corn bread. I love corn bread, but it’s always too dry. This corn bread was amazing. It was not too dry and had little bits of corn in it. Delicious. This isn’t the only bread mix they have though.
A while back, I saw they had a Pumpkin Bread & Muffin mix and I decided to try it. The corn bread was so delicious, the pumpkin muffin mix must be delicious too, right? Here, I’ll review the mix for you so you can decide if you want to try some too. I made the muffins, so I’m not sure how this would change for the bread.
Review:
Taste: The taste was excellent. As soon as I opened the mix, the smell was amazing. It smelled like all the spices in pumpkin pie and tasted like it too. Absolutely delicious. 5/5 for sure.
Texture: The problem was the texture. They took longer to bake than the box said they would (I baked for 23 minutes and the box said 18-20 minutes). When I took them out, the first one I had stuck in my teeth a bit like it was chewy. This improved as they cooled, but what kind of baked good isn’t divine right out of the oven? 3/5 for this.
Appearance: As you can see, my muffins were not very muffin shaped. I have an oven thermometer so I know that wasn’t the problem. They look funky, but not the worst I’ve seen. 4/5
Ease: This muffins were very easy and I imagine the bread would be as well. I understood the directions well and they were simple to follow. 5/5
Overall, I’d give these 4/5. They were definitely easier than making them by hand, but they weren’t the perfection I was looking for.
Ciabatta
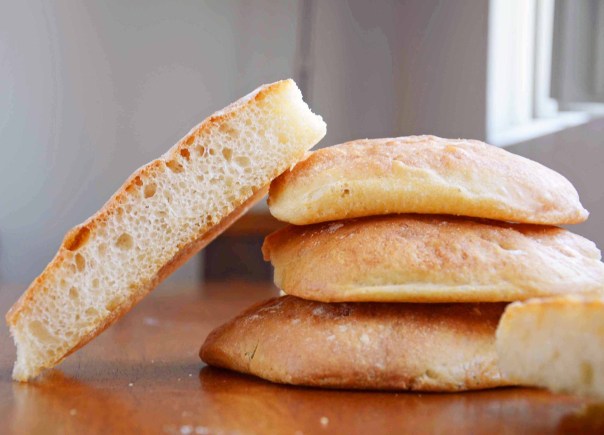
I recently tried to make focaccia bread. It was delicious so I decided to try to make other sandwich breads too, like ciabatta. I looked at the recipe for ciabatta and saw that you needed something called a “biga” that you had to prepare a day in advanced. “Nope, not for me. Too advanced,” my brain said. Then Adventurous Holly (who made her appearance after sampling the skittles vodka) impulsively decided to start the biga. I’m now going to take this moment and thank Adventurous Holly. This ciabatta was delicious and not as difficult as I thought it would be. So, thanks, Adventurous Holly. The lesson I learned is one you can too: Making ciabatta is like making any other bread, but you start it much earlier than normal.
There are many breads that require starters like the biga for ciabatta. Sourdough is probably the most well known. In my searchings about biga, I found that a biga is used to make the bread chewier and add some flavor as well.
Making a biga is really simple. It only sounds intimidating because it’s a weird word and requires planning. It’s easy to plan though. If you have a day off, start the biga the night before. The biga takes 5 minutes to set up at the most so it isn’t a big deal. I promise it’s fine. The bread is so delicious, it’s worth the little bit of extra effort
This bread had the perfect light fluffy interior and a perfect crunchy outside. I had never had homemade ciabatta and it’s infinitely better than store bought. I think the main difference is the crust. This crust has a great texture and has that crunching sound you want to hear when you bite into ciabatta. Perfection in bread.
Recipe: (original here, but I found this to be confusing and I hope I can clarify things here)
Ingredients:
Biga:
1-1/2 cups all-purpose flour
1 cup water
1/4 tsp yeast
Dough:
1/4 cup water (plus extra if dough is dry)
2 tbsp olive oil
1-1/2 cups all-purpose flour
1-1/2 tsp salt
1 tsp sugar
1 tbsp nonfat dry milk
1 tsp yeast
Active time: 25 minutes
Inactive time: 20 hours
Servings: 12 servings
Cooking Instructions:
Start the biga about 12-15 hours before you want to begin making the bread. In a bread machine or an electric mixer combine the ingredients for the biga. Mix until fully combined (about 5 minutes). If using a bread machine, set to dough and then stop once combined. Allow to rest for 12-15 hours. It will rise a bit and then start to sink. This is when you want to use the biga. The biga will big liquidy and bubbly.
To start the dough, combine the biga and the other dough ingredients into the bread machine pan or the electric mixer bowl. If using a bread machine, set to dough cycle and start. If using an electric mixer, use a dough hook and a low setting to mix for 5-8 minutes and then let rise for 1 hour. The dough should be sticky and tacky. It should not be liquid, but it should be close. Add water or flour as necessary. Whenever you handle the dough, wet your hands with water or oil to prevent it from sticking to you. Half way through the rising time turn the dough over in the pan or bowl. This will be tricky because it’s so sticky, but just do your best.
Cover a cutting board in plastic wrap and cover the plastic wrap with oil. Cover two cookie sheets with oil (I only had one and all my bread baked into each other. Bad call, use two). Remove the bread from the bread machine or mixing bowl after the rising cycle is complete or it has risen for 1 hour and place on the cutting board. Divide the dough into 6 equal parts for large sandwich rounds or 12 for smaller sandwich rounds. Place half on one cookie sheet and the other half on the other cookie sheet. Shape the dough by pushing and pulling the edges of the dough until it is shaped how you want. It won’t be perfect, so don’t try.
Cover the dough with oiled plastic wrap and let rise for 1 hour. Uncover and (with wet fingers) poke holes gently into the dough. This will give it a more rustic look. Recover with freshly oiled plastic wrap and let rise for another hour. Preheat the oven to 425°F. Bake for 25-30 minutes. Remove from the baking sheet and turn off the oven. Place the bread back in the oven and crack the oven open while it cools. Allowing the bread to bake this way will create a crunchier crust (maybe take one out to munch on while the rest crisp up). Remove from oven and enjoy. And don’t forget to go for second helpings!
Cauliflower with Tahini
This sounds weird, I know. I first saw this combination on a menu at Pita Jungle. This place is awesome. All the food is delicious and healthy. If you have one in your area, you should check them out. So when I first went there, I thought I’d try something new, “Caramelized Cauliflower with Tahini.” It was amazing. I’d go there just to get some of this.
Then I tried it at home. The first time, I accidentally fried the tahini. Whoops. Don’t do that. The second time I realized how easy it was to make on my own. I still get it all the time at Pita Jungle because it’s still slightly better there, but I make it for myself a lot too.
This recipe only requires 4 ingredients. One of which is tahini. Tahini is sesame seed paste. It’s quite tasty and is a key ingredient in hummus. You can find it at Trader Joe’s next to the hummus in the refrigerated section. You won’t use all of the tahini you buy in this recipe so you could use some to make hummus. This recipe is delicious as a snack and will make you love cauliflower.
Recipe:
Ingredients:
1/2 head of cauliflower, cut into bite sized florets
2 tbsp tahini sauce (found at Trader Joe’s)
1 tbsp pine nuts
2 tbsp olive oil
Prep time: 15 minutes
Serving size: 1 snack sized portion
Cooking Instructions:
Add the olive oil to a medium sized skillet. Heat to medium heat. Once hot (water sizzles when you drip a little on the pan), add the cauliflower. Saute until soft. To speed this up, you could cover the pan and stir occasionally. Add the pine nuts and cook for 1 minute longer. Remove from heat and pour into a serving bowl. Add the tahini sauce and mix together. Serve immediately. Enjoy and don’t forget to go for second helpings!
Skittles Vodka Party Favors
Isn’t that just what you always want to see when you come to a blog? Rainbow alcohol. Absolutely (pun intended)!
With New Year’s Eve coming up, everyone is looking for ideas for their party. One party I had in college was a “Taste the Rainbow” party. We infused vodka with each flavor of skittles and had everyone dress up in skittles colors. Everyone looked funny in their rainbow outfits and had a great time. The skittles vodka was a hit too. When I was thinking of things that would make party favors I thought of mini bottles of alcohol. That seemed boring so then my boyfriend thought of mini bottles of skittles vodka! Brilliant!
Skittles vodka tastes fruity and delicious, but it’s very strong so be careful. You can mix this alcohol with fruity juices, sprite, or even ginger ale. It also tastes good just by itself. Have fun with this, but remember to be responsible too. Happy New Year’s everyone!
UPDATE THAT WILL ROCK YOUR WORLD: Mix the orange skittles vodka with cranberry juice. It’s magical. And when you’re done with that, mix the yellow skittles vodka with lime margarita mix. Delicious. Ok, continue with the normal post.
Also, I always wondered what the bottles of Absolut say on them. They have a novel written write on the label. In case you were curious too, the bottles read, “This superb vodka was distilled from grain grown in the rich fields of southern Sweden. It has been produced at the famous old distilleries near Ahus in accordance with more than 400 years of Swedish tradition. Vodka has been sold under the name Absolut since 1879.” History of Absolut on the label. There you go.
Recipe:
Ingredients and Equipment:
1 lb bag of skittles
30 mini bottles of vodka
Coffee Filters
5 empty containers with lids (water bottles, tupperware, I used cups with plastic wrap on top)
Funnel (or crazy good pouring skills)
Prep time: 45 minutes
Inactive time: 1 day
Cooking Instructions:
Separate all the skittles by color. Pour 6 of the mini bottles of vodka into one of the empty containers. Save the mini bottles Add 120-150 red skittles. Repeat this with all the colors. You should have 5 containers with skittles of different colors in vodka at the end. Stir each container. Cover each container and set aside for at least 24 hours or until the skittles are dissolved. Shaking or stirring occasionally helps.
Once dissolved, get out about 4 coffee filters and pour a portion of one color through the filters into an empty cup. Once the flow rate slows down, squeeze the liquid through like how your supposed to squeeze a toothpaste bottle (back to tip). If there is still white gelatin floating, filter again. Continue this until there is minimal gelatin floating in the vodka. If your friends are like mine, they won’t care about a little bit left. I found that the white gelatin stands out most in the green and purple so I filter these twice. Repeat this until you have filtered all of one color. Use the funnel or your pouring skills to pour the vodka back into the mini bottles. Repeat this for each color. Depending on how many filters you used and how many times you filtered, you may not end up with as many mini bottles full as you started. You can fill the mini bottles that are only part full using more vodka if you want or just have extra mini bottles for other uses. You should end up with about 5 or 6 bottles of each color. Use as party favors for New Year’s or any other adult party. Enjoy!
Tomato Gorgonzola Soup
Until recently, I didn’t really like soup. Something about drinking food with chunks in it seemed really weird to me. That was until I went to this small soup shop in Tacoma, Washington called Infinite Soups. I had a tomato gorgonzola soup, and it was amazing. Since then, I have tried other soups and they’ve been good, but they’ve never compared to the tomato gorgonzola I first had at Infinite Soups. If you ever get the chance to go there, I highly recommend it. They even have vegan and vegetarian selections and all the soups are made fresh daily.
I’m always worried to try to make my favorite of anything because I’m worried it won’t turn out well. There’s nothing worse than expecting something awesome and getting something awful. Luckily, that was not the case this time.
When I realized my boyfriend and I had guests coming over for dinner, I decided soup was an easy option and I should try to make my favorite soup. I took the risk that it might turn out bad, any it actually turned out really well! It was creamy and cheesy and tomato-ey. All of the flavors came out smoothly and none were overpowering. This is a delicious one-pot meal that makes food that will last for days. It was a hit with everyone else as well. This would be a great meal for a potluck as a vegetarian option.
While I was looking around for a decent recipe for a tomato soup, I found out that baking soda will prevent milk from curdling. I think it must be something about it being basic since it’s sodium bicarbonate, but I don’t know why. I didn’t search for very long, but I couldn’t find any answer for why this happens. Does anyone know? I’ll give you a recipe for tomato gorgonzola soup if you can tell me…oh wait….
Recipe:
Ingredients:
2 tbsp olive oil
1 white onion, chopped
3-4 cloves garlic, minced
1/2 tsp baking soda (to prevent curdling)
8 oz low fat cream cheese
8 oz gorgonzola cheese
1 cup half and half
3-14.5 oz cans of fire roasted tomatoes, salt free
2 cups low sodium tomato juice
1/2 tsp basil
1/2 tsp paprika
1/2 tsp oregano
salt and pepper, to taste
Prep time: 30 minutes
Servings: 8 servings, about 1-1/2 cups each
Cooking Instructions:
In a large sauce pan, heat the olive oil over medium heat. Add the onion and garlic and saute until the onion is tender, about 4 minutes. Add the baking soda, the gorgonzola cheese, the cream cheese, and the half and half. Break apart the cream cheese and stir until the cheeses have melted. Increase the heat to medium-high and let the soup heat for a few minutes, stirring occasionally. Add the canned tomatoes, tomato juice, and spices. Stir to combine. Heat for a few minutes until the tomatoes are slightly tender. Then blend the soup using an immersion blender or by pouring the soup into a regular blender and blending in parts and return to heat. Stirring frequently, heat to a simmer and let simmer for at least 10 minutes. Remove from heat and serve immediately. Garnish with extra oregano or basil. Enjoy and don’t forget to go for second helpings!
Focaccia
I never really thought of myself as a cook or really enjoyed cooking much, but last week I was on vacation with my family and boy did I miss cooking. I came home with loads of ideas for recipes to make. I even convinced my sister (who also likes to cook) to start her own food blog. We’re going to have a food picture competition. I’m going to win.
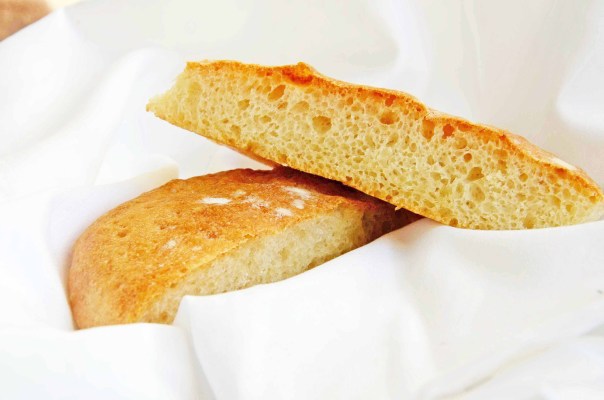
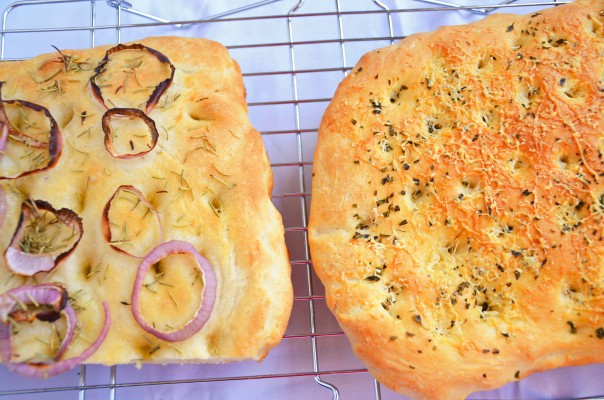
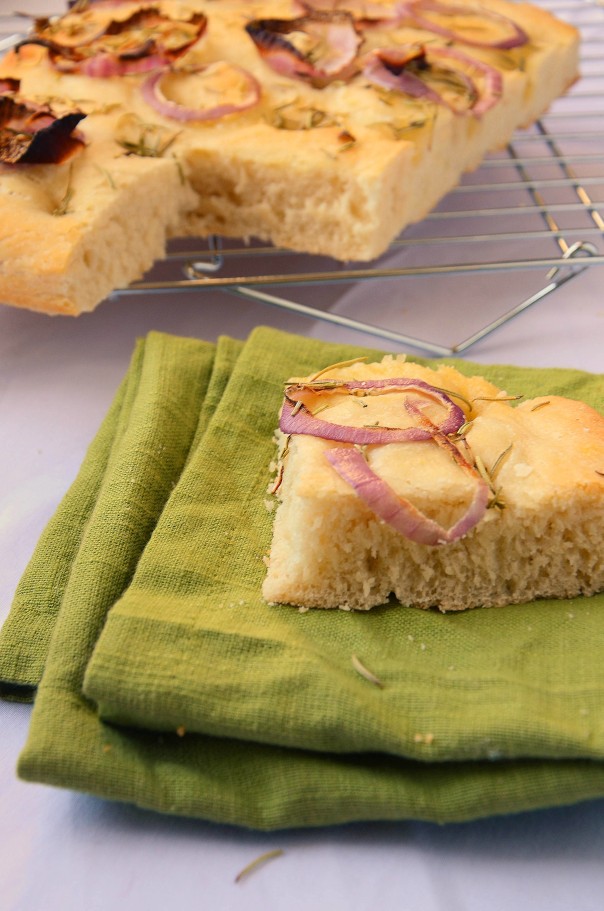
Focaccia is delicious. It’s an Italian bread that’s great for sandwiches and paninis or for dips and spreads. It’s also a really variable bread. You can add almost anything to focaccia and it will still taste amazing. Focaccia can also have different types of crust. It can have a thin cripsy crust that’s good for soup dipping or it can have a thicker crust that will make the perfect panini. Here, I made two loaves of focaccia bread. The first loaf is an onion rosemary loaf with a crispy crust and the second loaf is an asiago oregano loaf with a thick crust. You can see the different types of crust in the picture above. The piece on the left is not as dark and has no distinct “crust” while the piece on the right has a darker top and you can see clearly where the crust ends.
Focaccia is actually much easier than I expected to make. The base recipe only requires 5 basic ingredients and the hardest part is waiting for the silly loaf to rise (I’m impatient). I love to make bread and I want other people to enjoy making bread too, so I always like to find a common or delicious bread recipe that is easy for anyone to make. This is that recipe.
Recipe:
5 cups of all-purpose flour (plus extra for sprinkling)
2 tsp yeast
3 tbsp extra virgin olive oil (plus extra for coating)
1 tsp salt
2 cups lukewarm water
toppings of choice (optional)
For the Rosemary Onion Loaf:
1/4 red onion sliced into rings
1/2 tbsp dried rosemary
For the Asiago Oregano Loaf:
1 tsp dried oregano
1/4 cup shredded asiago cheese
Prep time: 25 minutes
Inactive time: 2 to 2-1/2 hours
Bake time: 20 minutes
Servings: Makes 2 15″x12″ loaves (each loaf has about 8 pieces in it)
Cooking Instructions:
Combine all the ingredients except the water and the toppings in a large mixing bowl. Add 1/2 the water and stir to combine. Add more water in small portions and mix to combine until you have a shaggy ball of dough. By “shaggy” I mean the point where all the flour is incorporated, but it is still crumbly.
Remove this ball from the mixing bowl and place on a lightly floured surface. Knead the dough for about 10 minutes or until you can insert two fingers and have the impressions remain. For an awesome tutorial on kneading, check out this video. I posted this in my recipe for whole wheat breadsticks, as well. This dough is much better for learning to knead with though. This dough is much softer than the breadsticks and if you knead long enough, you can see a clear change in texture.
When you are finished kneading place the dough into a bowl coated with olive oil and cover with plastic wrap. Let rise for about 1 hour or until the dough has doubled in size. Coat two cookie sheets with olive oil.
After the dough has risen, divide it into two equal portions. Place one portion on each of the prepared cookie sheets. Shape the dough by pressing the dough down into the desired shape (square or round) until about uniformly 1″ thick. Cover again with oiled plastic wrap and let rise for about 20-30 minutes or until you can press into the dough with a finger and the indentation stays. Longer is usually better.
After the second rising, preheat the oven to 425ºF. Use your finger to make dimples all over the dough. Dimples should be about 1″-2″ apart. Pour olive oil all over the dough ensuring to place some in each dimple. Use a quality olive oil as it will flavor the dough. Add any toppings at this time as well.
For a crispy thinner crust:
Place the cookie sheet in the oven immediately after adding the toppings. Bake for about 20 minutes or until light golden brown. Remove from the oven. Allow to cool on a wire rack before slicing.
For a thicker crust:
Cover the dough with oiled plastic wrap and allow the dough to rise one final time for about 20 minutes after adding the toppings. Place in the oven and bake for about 20 minutes until golden brown. Remove from oven and allow to cook on a wire rack before slicing.
Enjoy and don’t forget to go for second helpings!

